Operations
The operations aim to set related parameters for the target layer.
To do layer related operations, do the following in Layer Setting dialog box:
After doing layer related operations, in the technic operation bar, do the following:
Set Film Parameters
It is used to solve the problem that the film on metal material is melted and stuck to the cutting head and the sheet during cutting coated metal material.
To set film parameters, do the following:
To switch to Film Cutting Param page, in the parameter setting bar, click Film Cutting Param:
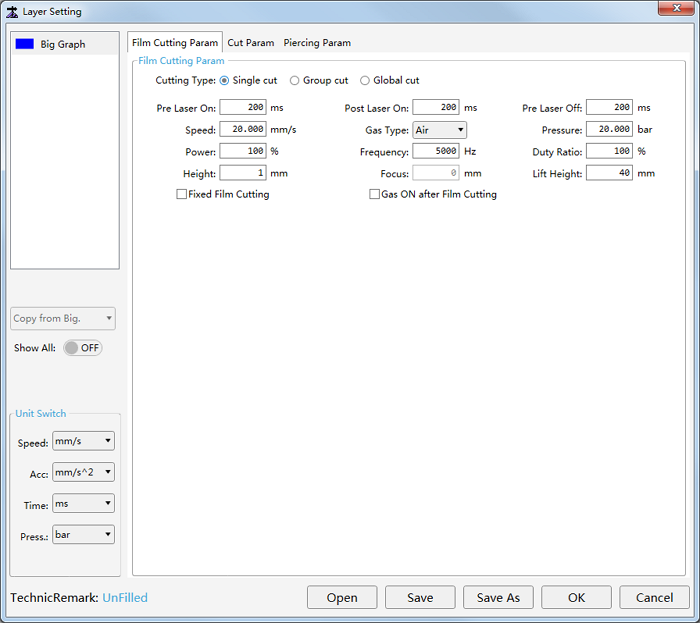
Select a cutting type, and set related film cutting parameters.
See Film Cutting Parameters for parameter details.
Optional: To do film cutting at the fixed height (determined by common parameter Fixed Height), check Fixed Film Cutting.
Optional: To turn on the gas during / after film cutting, check Gas ON after Film Cutting.
Set Cutting Parameters
It is used to do the following:
Set cutting parameters.
Set special technics.
Edit the power curve.
Used to make the cutting power and frequency change with the cutting speed accordingly and make sure thermal power absorbed in unit area is the same and achieve fine cutting result, so as to solve problems like over-burning around the corner and different cutting results in terms of thickness.
To set cutting parameters, do the following:
To switch to Cut Param page, in the parameter setting bar, click Cut Param:

Set parameters in Cut Param area and Special Technic area.
See Cutting Parameters for details.
To adjust speed power and speed frequency, check Adjust Speed Power and Adjust Speed Frequency in Power Curve area. The system makes the cutting power and cutting frequency change with the cutting speed during cutting.
Otherwise, the cutting power and cutting frequency will keep the same all the time during cutting.
Taking checking Enable Speed Power Adjust as an example, to open Speed Power Curve Editing dialog box, click Edit.
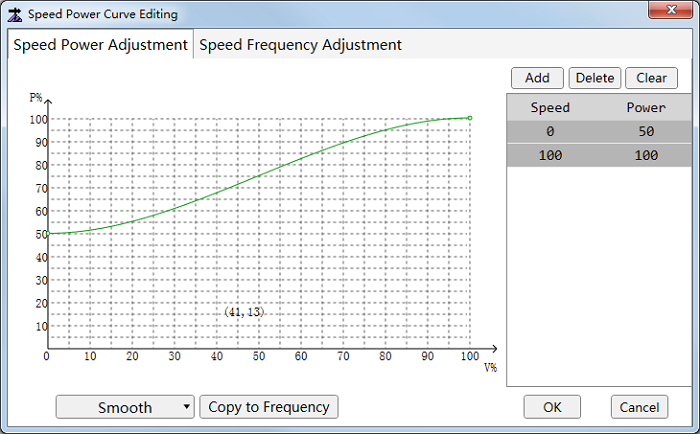
To modify the node, do one of the following:
On the curve, to add a node, double click the target position, or to delete a node, double click the target node. The corresponding speed and power nodes are added / deleted in the right list synchronously.
The more the added nodes, the more accurate the curve.
In the list, to add a group of speed and power nodes, click Add, and double click to modify the values, or to delete a group of speed and power nodes, select the values and click Delete. The corresponding speed and power nodes are added/deleted on the left curve synchronously.
Note: The curve is an increasing curve. Thus, the added value should be greater than the previous values. And 0 / 100 cannot be modified.
If you need to restore the curve to the default, click Clear.
Set Piercing Parameters
To set piercing parameters, do the following:
To switch to Piercing Param page, in the parameter setting bar, click Piercing Param:
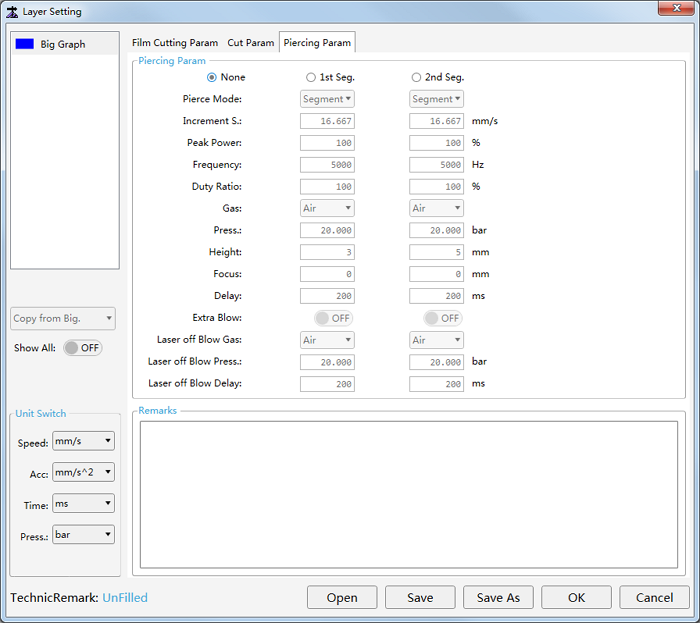
Select a piercing method.
See Piercing Methods for details.
Set piercing related parameters.
See Piercing Parameters for details.
Optional: If parameter Pierce Mode is set to Gradual, set parameter Increment S.
The cutting head will fall to the cutting head at the set increment speed. Otherwise, it will follow to the cutting head.
Optional: To make the system turn off the later and execute blowing after piercing, set Extra Blow to ON status, select a gas type in the drop-down box of Laser off Blow Gas, and set parameters Laser off Blow Press. and Laser off Blow Delay.
Otherwise, the system will execute blowing with the laser on after piercing.
Add Technic Remarks
It is used to set technic remarks, and it is convenient to automatically generate the name of a technic file during saving or saving as the technic file.
Naming rule: Laser power - Material - Thickness - Machining type - Cutting gas - Nozzle type - Aperture
To add technic remarks, do the following:
To open Set Technic Remark dialog box, in the technic operation bar, click the blue characters after character TechnicRemark:
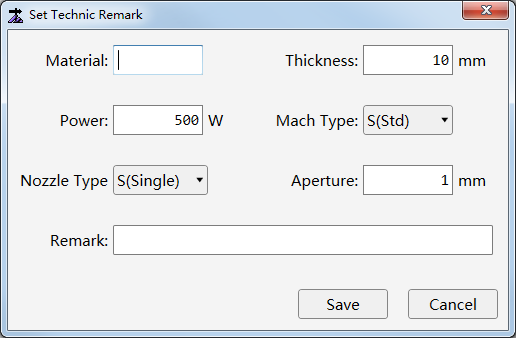
Set the material type, thickness, laser power, machining type, nozzle type and nozzle aperture.
Add remarks.
Open / Save / Save as Technics
It is used to open a technic file, save technics or save technics as the target path.
Naming rule of technic files: Layer name - Material - Thickness - Laser power - Machining type - Nozzle type - Aperture - Cutting gas - Remark
The format of technic files should be LTPX.
To open / save / save as technics, in the technic operation area, do the following:
To open a technic file, click Open, and select the target technic file. The name of the technic file shows in the upper right corner of Layer Setting dialog box.
The technic file will overwrite the original one if there already exists a technic file.
To save technics, click Save:
If the technic file is newly created, set related information and click Save in Save Technic As dialog box, select the target path and click Save.
If there already exists a technic file (technic name shows in the upper right corner), the technic file is updated.
To save the existed technic file to the target file path with the target file name, click Save As, set related information, click Save in Save Technic As dialog box, select the target path and click Save.