Set NcConfig
The offline configuration tool NcConfig can be used to backup/restore data, configure devices, and map/protect the ports to improve project development efficiency.
Follow the steps below the configure settings in NcConfig:
Open the Ncstudio installation path C:\Program Files\Weihong\NcStudio\NcConfig\Bin. Find and double-click NcConfig.exe.
Use the following functions based on your needs:
Data Backup
Backup the data to prevent data loss due to incorrect operation, and it can be used to restore the data.
Operation Steps:
(Optional:) In the NcConfig interface, if the content has been edited in the NcConfig interface, choose one of the following methods to save:
- If need to save the edited content of the current page, click
 Save in the toolbar.
 - If need to save all edited content on the page, click
 Save All in the toolbar.
- If need to save the edited content of the current page, click
If it is not saved after editing, a * mark will appear in the upper right corner of the corresponding page button, and it will disappear after saving.
- In the menu bar, go to Systems > Backup and Restore.
- In the Backup and Restore Data window, select Backup Data. Click Next.
- Edit the backup file name and storage path as needed.
- Click Finish. .
Data Restoration
If data is lost due to incorrect operation, you can use NcConfig to restore data. If system environment data is lost due to system damage, you can use the installation package and the data restoration function to recover the system.
Prerequisite:
Before restoring the data, ensure that the data was backed up as described in Data Backup.
Operation Steps:
(Optional:) In the NcConfig interface, if the content has been edited in the NcConfig interface, choose one of the following methods to save:
- If need to save the edited content of the current page, click Save in the toolbar.
- If need to save all edited content on the page, click Save All in the toolbar.
- If need to save the edited content of the current page, click
If it is not saved after editing, a * mark will appear in the upper right corner of the corresponding page button, and it will disappear after saving.
- In the menu bar, click Systems > Backup and Restore.
- In the Backup and Restore Data window, select Data Restore. Click Next.
- Click Browse to select the userpkg format file and click Open.
- Select user data or machine actual data according to the actual situation:
- User Data: including control parameters, port information and port mapping.
- Machine Specific Data: cannot be shared with other machine tools, such as datum, lead screw error compensation, QEC, etc., otherwise it may cause errors.
- Click Finish.
Device and Port Mapping Configuration
You can configure devices and modify port physical addresses to match their logical addresses.
Operation Steps:
In the left Configuration column, go to NcStudio > Hardware Connection and Configuration > Device Configuration.
If the Configuration column is not opened, click View → Configuration on the menu bar to call it out.
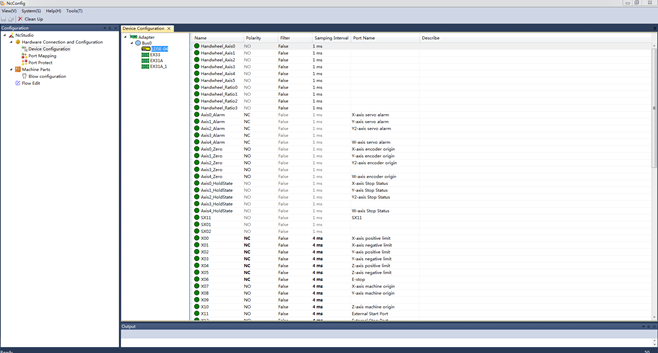
Configure the devices based on your demands:
- Create groups for hardware devices (Bus0, Bus1, etc.): Right-click Adapter and select Add Bus.
- Add controller: Right-click the target Bus, select Add Controller, and add devices in the controller selection bar according to the wiring order.
- Need to replace target controller: Right-click the target controller, click Replace, and click to select the target controller.
- Move target controller: Right-click the target controller and click Up/Down.
- Delete device groups (Bus0, Bus1, etc.): Right click the target Bus and select Delete.
- Delete target controller: Right-click the target controller and click Delete.
In the NcConfig, click the left Configuration column. Click NcStudio > Hardware Connection and Configuration > Port Mapping.
Double-click Port Mapping to find the target port after select the port classification in the left list.
Double-click the target port Physical Address column and select the controller and port for the target port.
Edited ports are displayed in bold. When the physical address of one port is used to multiple ports, a
 mark appears before the multiplexed port.
Choose one of the following methods to save:
- If need to save the edited content of the current page, click Save in the toolbar.
- If need to save all edited content on the page, click Save All in the toolbar.
If it is not saved after editing, a * mark will appear in the upper right corner of the corresponding page button, and it will disappear after saving.
- If need to save the edited content of the current page, click
Related Tasks:
After the port configuration is complete, the following management operations can also be performed on the Port Mapping page:
Hide logical addresses:
- Right-click anywhere in the I/O list and select Hide Logical Address, then the I/O list will hide the Logical Address column.
Show logical address:
- Right-click anywhere in the I/O list and select Show Logical Address, then the I/O list will display the Logical Address column.
Delete port mapping:
a. Check one or more target ports.
b. Right-click and select Delete Port Mapping, a confirmation prompt box will pop up.
c. Click OK. Then add ..null characters after the physical address of the object.
Delete invalid port mapping:
a. Check one or more target ports.
b. Right-click and select Delete Port Mapping, a confirmation prompt box will pop up.
c. Click OK. If the port mapping is invalid, delete the specific condition, and the triggered port that cannot be used will be displayed in red.
Set Port Protection
When the software is closed, the protected ports will be automatically closed, opened, following the status of the specified port, or reversed based on their port protection type.
Effective time of port protection: normal shutdown and abnormal hardware connection.
There are several types of port protection:
Open: The port will be automatically opened when the software is closed.
Close: The port will be automatically closed when the software is closed.
Follow: The protected port status will be turned the same with that of the port specified in the Follow Port column.
Reverse: The protected port status will be turned the opposite to that of the port specified in the Follow Port column.
Operation Steps:
In the left Configuration column, click NcStudio → Hardware Connection and Configuration → Port Protection to open the Port Protection window to the right:
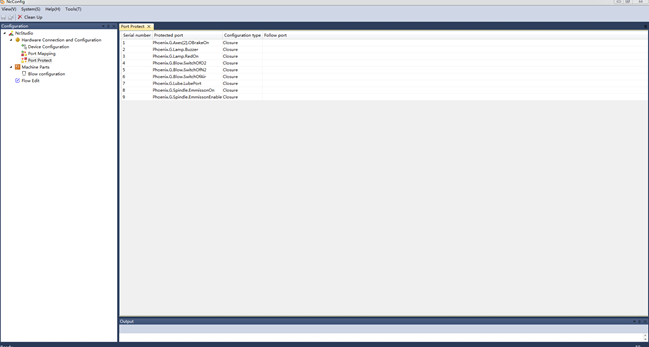
Select and click the Configuration Type field of the target port and select a protection type in the pull-down menu.
Select one from the following methods to save the changes:
- If need to save the edited content of the current page, click Save in the toolbar.
- If need to save all edited content on the page, click Save All in the toolbar.
- If need to save the edited content of the current page, click
If it is not saved after editing, a * mark will appear in the upper right corner of the corresponding page button, and it will disappear after saving.