View Operation
View function is used for a better view of objects without changing the actual sizes and coordinates.
Pan the View
Repositioning the graphic in the window is convenient for observing different parts of the current graphic.
Operation Steps:
To pan the view, do one of the following:
Press the mouse wheel and drag the mouse to the target position.
Use the view pan function:
Select from the following methods to use the view pan tool:
In the drawing toolbar, click the
 Pan.
Pan.In the menu bar, click View → Pan.
Select a datum point, press and hold the left mouse button, drag to the target position and release the mouse.
To stop panning the view, right click or press Esc.
Zoom in/out
Zoom in and out of view in real time. Through changing the size of the shown area and objects, you can draw objects more precisely.
Operation Steps:
In the menu bar, click View → Zoom to use zoom in and out of view in real time.
To zoom in/out the view, do the following:
Scroll up the mouse wheel to zoom in the view and scroll down the mouse wheel to zoom out the view.
Hold and drag up the left mouse button to zoom in the view, and hold and drag down the left mouse button to zoom out the view.
On the numeric keypad, press + to zoom in the view, and press - to zoom out the view.
Right click or press Esc to stop.
Zoom in the Selected Area
Zoom in the selected part of the object to the size of the drawing window.
Operation Steps:
To use Zoom by Rect command, do one of the following:
In the drawing toolbar, click the
 Zoom by Rect.
In the menu bar, click View → Zoom by Rect.
Left click on the drawing window, drag the mouse to form a rectangle and left click again. The area formed by the rectangle zooms in.
Best View
Resize objects and make them fit to the drawing window on the premise of showing all objects.
Operation Steps:
In the drawing toolbar, click
 Best View.
In the menu bar, click View → Best View.
On the numeric keypad, press *.
Show/Middle Current Point
Click View in the menu bar:
Show current point: The current point refers to the current position of the cutting head, the icon is as follows:
Middle current point: Show the layout of the current drawing area with the current point as the center.
Show Setting
Click the drop down box of View in the menu bar to provide buttons to control the show effect.

Check the button in the red box, the show effect will take effect immediately, and you can see the change of the show effect in the drawing area. If the button is checked, it means that the corresponding effect is turned on, otherwise, it means that the effect is not turned on.
Show Track
Show the machining track with a red line. During simulation, the simulated machining track is displayed in real time.
In the menu bar, select from the drop down button of View → Show Track:
- Hide track
- Show machining track
- Show feedback track
Note
Three options, only one can be chosen.
If you want to clear the machining track, select any of the following methods:
- In the menu bar, click View → Clear Track.
- In the common toolbar, click Clear → Trajectory.
Fill Mode
View the closed graphics set to Fill. In this mode, the closed graphics of Fill are filled and displayed, and the other graphics are displayed in wireframe.
In the menu bar, click View → Fill Mode to switch to fill mode:
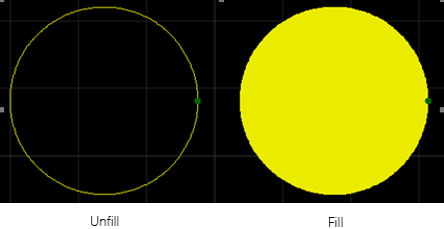
To switch back to the system default wireframe mode, in the menu bar, click View → Wireframe Mode, all graphics will be displayed in wireframe mode.