Arrange the Path
It is used to specify the processing order of each graphics in the tool path file. You can find  Sort in the common toolbar. All functions as shown in the picture.
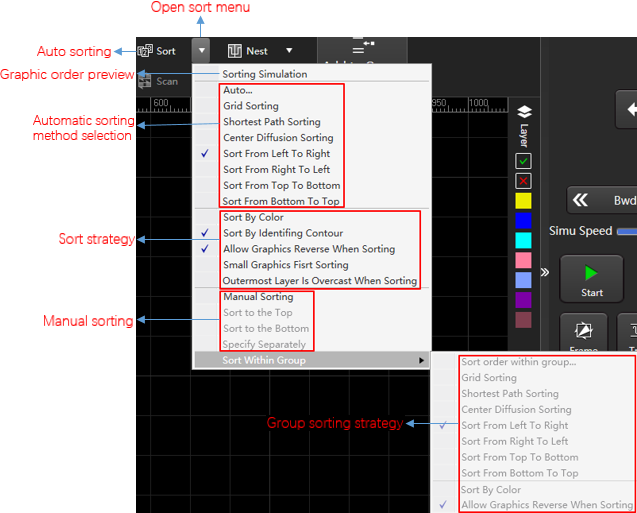
Description of the sort strategy:
- Sort by Color: The graphics in the part are sorted again according to the sequence of layers, which is only applicable to parts with nesting relationship.
- Allow Graphics Reverse when Sorting: In order to make the cutting path more coherent, it is allowed to automatically reverse the cutting direction of some graphics.
- Sort by Identifying Contour: Distinguishes inner and outer membranes of graphics when sorting.
- Small Graphics First Sorting: The small graphics whose size is smaller than the set value are sorted first, only applicable to parts with nesting relationship.
- Outermost Layer is Overcast when Sorting: By default, the outermost layer of the graphic is unfill.
- Sort within Group: The sorting of graphics in multiple combinations changes according to the sort strategy.
If need displays the original machining sequence in the tool path, select any of the following methods to operate:
In the common toolbar, click
 Show Order.
In the menu bar, click View → Show Order.
Auto Sort
The system automatically arranges the machining sequence according to the selected sort strategy.
Method 1
Operation Steps:
Optional: Selected objects if sorting only selected objects.
Select any of the following methods to open the AutoSort dialog:
In the common toolbar, click
Sort .In the common toolbar, click
Sort drop down box → Auto.Right click to call the shortcut menu, click Mach Order → Auto Sorting.
In the menu bar, click Tool Path → Auto.
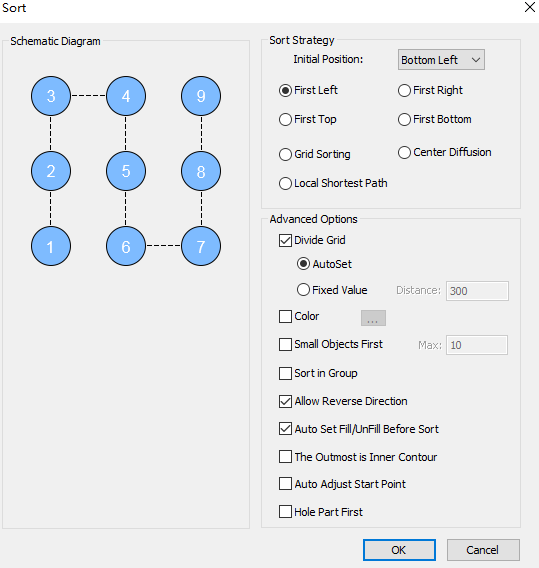
Select sort strategy.
Set advanced options, including:
Option Description Divide grid Direction sort strategy.
▪ Select Auto Set to automatically divide the sort distance according to the distance and number of all graphic directions sorted.
▪ Select Fixed Value, input a fixed value interval, and when the interval between graphics is smaller than the set value, it will be divided into one area.Color The graphics in the part are sorted again according to the order of the layers, which is only applicable to the parts with nesting relationship. Small objects first To sort objects whose sizes are less than the set value. It only applicable to part interior with nested relation. Sort in group To sort objects in groups according to the sort strategy. Allow reverse direction To change the machining direction and start position. Auto set fill/unfill before sort After checking, the unfill/fill are automatically set when sorting. The outmost in inner contour After check the outermost layer of the graphics as unfill. Auto adjust start point After check to allow automatic modification of the start point. Hole part first After checking, the sort strategy acts on the inner membrane graphics first, and then on the outer membrane graphics. Click OK.
Related Tasks:
If need to individually set the sort of graphics within a single group, select any of the following methods to open the Sort dialog box and set the sort strategy and advanced options:
In the common toolbar, click
Sort drop down box → Sort within Group → corresponding operation.Right click to call the shortcut menu, click Sort within Group → corresponding operation.
Method 2
Operation Steps:
Optional: Selected objects if sorting only selected objects.
In the common toolbar, click
Sort drop down box → Select sort method:
Click
Sort drop down box → Select sort strategy: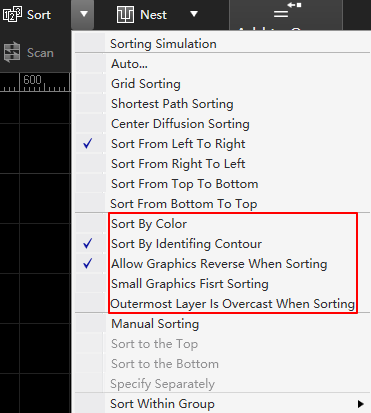
Manual Sort
Manually specify the machining sequence for single or multiple objects.
Operation Steps:
Select any of the following methods to invoke the manual setting function:
In the common toolbar, click
Sort drop down box → Manual Sorting.Right click to call the shortcut menu, click Machining Order → Manual Sorting.
In the menu bar, click Tool Path → Manual Sorting.
The cursor becomes
 and automatically display the machining order.
Select the target graphic to be set as the first one.
The cursor becomes
 , the machining order on the object turns into 1, and the order of other objects turns into 2,3 ... in sequence on the basis of previous order.
To reset the last order number, right click and select Previous Order.
Repeat step 2 and click the objects in order.
After manually changing the machining order, to exit Manual Sorting command, right click and select Exit, or press Esc.
Specify the Machining Order for a Single Workpiece
Manually specify the machining order of an object.
Operation Steps:
Select an object.
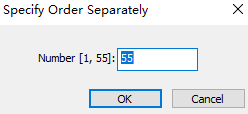
Select any of the following methods to open the Specify Order Separately dialog box:
- In the common toolbar, click Sort drop down box → Specify Order Separately.
- In the common toolbar, click
To specify an order, enter an order in Number
[1, n]input box.n is the maximum machining order in the tool path.
Sort to the Top/Bottom
Change the machining order of the selected single object to the top or the bottom.
Operation Steps:
- Select an object.
In the common toolbar, click
Sort drop down box → Sort to the Top / Sort to the Bottom.In the menu bar, click Tool Path → Manual Sorting → Sort to the Top / Sort to the Bottom.
Right click to call the shortcut menu, click Manual Sorting → Sort to the Top / Sort to the Bottom.