Drawing Operations
This section introduces tools and operations for drawing objects.
It is used to draw machining objects.
To select a drawing tool, do one of the following:
In menu bar, click a drawing tool instruction under Draw menu.
In drawing tool bar, click a drawing tool:
After using the drawing tool, right click or press Esc to exit the tool.
After drawing, do the following:
To save the file, click File → Save.
To adjust the object, do one of the following:
- In toolbar, modify the size and position of the object.
- In drawing window, drag the rectangular points around the object to modify the size.
Draw a Polyline
A polyline is a chain of lines and arcs that are joined together into one object. It includes line and tangent arc. Tangent arc corresponds to the arc.
To draw a polyline, do the following:
Select the polyline drawing tool.
Left click to specify two points to draw a line.
Optional: To switch to drawing arc mode, right click and select Tangent Arc.
The arc is tangent to the last line/arc.
If you need to switch to drawing line mode, right click and select Line.
Left click to specify the next point.
Right click and select one of the following:
- Confirm: confirm the current point is the end point. The polyline is an unclosed object.
- Cancel: cancel the previous operations and exit drawing a polyline.
- Close: connect the current point to the start point. The polyline is a closed object.
If you need to change an unclosed polyline into a closed one, select it and check Close in toolbar. This operation is irreversible.
Draw a Circle
To draw a circle, do the following:
Select the circle drawing tool.
Left click to specify the center point.
Left click to specify a point.
The distance between this point and the center point is the radius.
Draw an Arc
To draw an arc, do the following:
Select the arc drawing tool.
Left click to specify the center point.
Left click to specify the start point.
The distance between the start point and the center point is the radius.
Left click to specify the end point.
The system generates a toolpath in counterclockwise direction.
Draw an Ellipse
To draw an ellipse, do the following:
Select the ellipse drawing tool.
Left click to specify the center point.
Left click to specify two points separately.
The distances between the center point and the two points are major axis and minor axis of the ellipse separately.
Draw an Elliptic Arc
To draw an elliptic arc, do the following:
Select the elliptic arc drawing tool.
Draw an ellipse. Refer to Draw an Ellipse for details.
Left click to specify the start point and the end point separately.
The system generates a toolpath in counterclockwise direction.
Draw a Polygon/Star
To draw a polygon/star, do the following:
Select the polyline/star drawing tool.
Enter the following number in toolbar:
- Regular polygon: enter the number of edges in Edges input box.
- Star: enter the number of vertexes in Vertexes input box.
Press Enter.
Left click to specify the center point and a vertex separately.
Enter Text
This operation is used to draw text in an advertisement board.
To enter text, do the following:
Select the text drawing tool.
To specify a text box, click and drag the mouse.
Enter text in the input box.
During entering, you can press Ctrl+Enter for line feed.
Press Enter.
Edit Advertising Words
This operation is used to fill the objects on the advertising board with circles.
It includes the following:
Before editing advertising words, ensure that you have plugged the dongle into the USB interface of your host.
Fill Objects with Circles
To fill the object with circles, do the following:
Select the target objects.
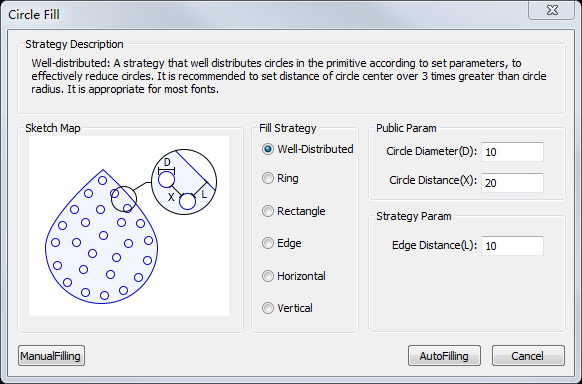
Click Draw → Advertising Words → Circle Fill. Circle Fill dialog box pops up:

Do one of the following:
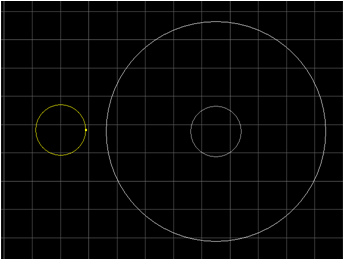
To manually fill the object with circles, set parameters in Public Param area and click the target position in the drawing window.
The system automatically generates a circle as follows:

Note: The small yellow circle has been added, the small white circle is to be added and the big circle is automatically generated for helping users to know the circle distance. The diameter of the big circle equals to Circle Diameter and Circle Distance.
To automatically fill the object with circles, do the following:
Select a filling strategy:
Well-Distributed
Used to well distribute circles in the object so as to effectively reduce circles.
It is appropriate for the irregular fonts.
Ring
Used to fill circles on generated contour lines so as to orderly arrange filled circles on the contour of the target object and effectively draw contour of object.
Rectangle
Used to fill circles with equal intervals, ensuring intervals between adjacent circles are the same.
It is appropriate for founder fonts.
Edge
Used to arrange circles on the edge.
It is appropriate for thin fonts.
Horizontal
Used to arrange circles on the line that is parallel with X-axis, ensuring circle centers of each row are on the same horizontal line.
It is appropriate for founder fonts.
Vertical
Used to arrange circles on the line that is parallel with Y-axis, ensuring circle centers of each row are on the same vertical line.
It is appropriate for founder fonts.
Set parameters in Public Param and Strategy Param areas, and click AutoFilling.
Check the Circle Quantity
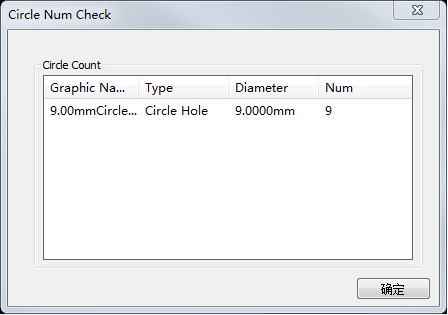
This operation is used to check statistics of circles, including their quantities and diameters.
To check the circle quantity, do the following:
Click Draw → Advertising Words → Circle Check.
Select the target region. Circle Num Check dialog box pops up:

Adjust Circles
This operation is used to change the distribution of certain circles so as to address the problem that the circles cannot be filled in certain regions or its filling effect is not good.
To adjust circles, do the following:
Click Draw → Advertising Words → Circle Adjust.
Set parameter Edge Distance and parameter Circle Distance.
Select the target region.
The system automatically deletes the circle in the target region and distributes circles with the rectangle filling strategy.
Erase Circles
This operation is used to delete redundant circles in the objects.
To erase circles, do the following:
Click Draw → Advertise Words → Circle Erase.
Select the target region.
 : Dot
: Dot : Line
 : Rectangle
 :
:  :
:  :
:  :
:  :
:  :
:  :
:  :
: