Add Chamfer
This operation is used to add chamfers to angles less than 180°, so as to improve cutting effect on corners of a thick workpiece. It is applicable to all objects.
To add chamfer, do one of the following:
-
Used to automatically add chamfer to the selected and qualified objects according to the set value.
-
Used to manually select chamfer position based on your need. The range of the angle is (0, 180)°.
Automatically Add Chamfer
To automatically add chamfer, do the following:
Select the target objects.
To open Chamfer dialog box, do one of the following:
- In menu bar, click Object → Special Technics → Chamfer.
- In drawing window, right click and select Chamfer.
Chamfer dialog box pops up:
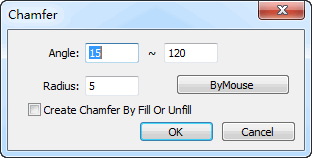
Set the range of the angle and the radius.
Optional: To automatically add chamfer according to the attribute of fill/unfill, check Create Chamfer By Fill Or Unfill.
It is only applicable to closed objects.
Example
Set the angle between 45° and 90° and check Create Chamfer By Fill Or Unfill.
The system automatically adds chamfer as follows:

Manually Add Chamfer
To manually add chamfer, do the following:
To open Chamfer dialog box, do one of the following:
- In menu bar, click Object → Special Technics → Chamfer.
- In drawing window, right click and select Chamfer.
Set the range of the radius, and select whether to check Create Chamfer By Fill Or Unfill.
Click By Mouse. The cursor turns into
 .
.Move the mouse to the target position and left click to select an adding position.
If you need to exit adding chamfer, right click the mouse.
Result of manually adding chamfer without checking Create Chamfer By Fill Or Unfill is as follows:
