Find Edges and Position
This operation is used to calculate the rotation angle between the current sheet and the machine coordinate system, so as to rotate the workpiece coordinate system (WCS) by corresponding angle and establish a new WCS.
To find edges and position, do the following:
To open Edge Finding dialog box, do one of the following:
- In common tool bar, click
 .
. - In menu bar, click Mach → Edge Finding.
- In common tool bar, click
Check Enable Edge Finding.
Select one of the following:
Two-point
Used to specify a new workpiece coordinate system by manually finding two points.
See Manually Find Two Points for details.
Three-point
Used to specify a new workpiece coordinate system by manually finding three points.
See Manually Find Three Points for details.
Auto
Used to specify a new WCS by automatically finding three points according to the set berth point.
See Automatically Find Edges for details.
After starting edge finding, the prompt Inclined angle in current edge finding is: X.XXX deg shows on the upper left of drawing window.
Manually Find Two Points
Before manually finding edges, click  to turn on the red light, so as to guide the locating position.
To manually find two points, do the following:
In Edge Finding dialog box, click Two-point so as to switch to its interface:
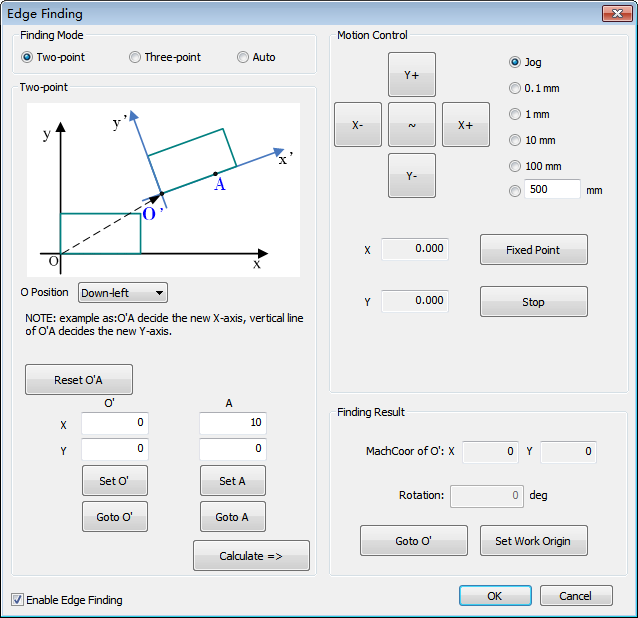
To specify upper right/lower right/upper left/lower left point on the sheet as the origin O' of the new WCS, select a point in the drop-down box of O Position.
You can check the diagram in Two-point area to check the diagram of point O relative to point O'.
To confirm the new WCS by specifying points A, manually move the cutting head to the sheet edge in the positive direction of X-axis and click Set A.The system automatically connects points A and O' to specify a new X-axis, and constructs a perpendicular line to line O'A through point O' to specify a new Y-axis.
Optional: To specify the point again, click Reset O'A. The system restores the current coordinate to the default value.
To check the calculated locating result in Finding Result area, click Calculate.
If the rotation angle exceeds 15°, it indicates that the sheet is tilted and needs placement, and you need find edges again.
Manually Find Three Points
Before manually finding three points, click to turn on the red light, so as to guide the locating position.
To manually find three points, do the following:
In Edge Finding dialog box, click Three-point to switch to manual three-point finding interface:
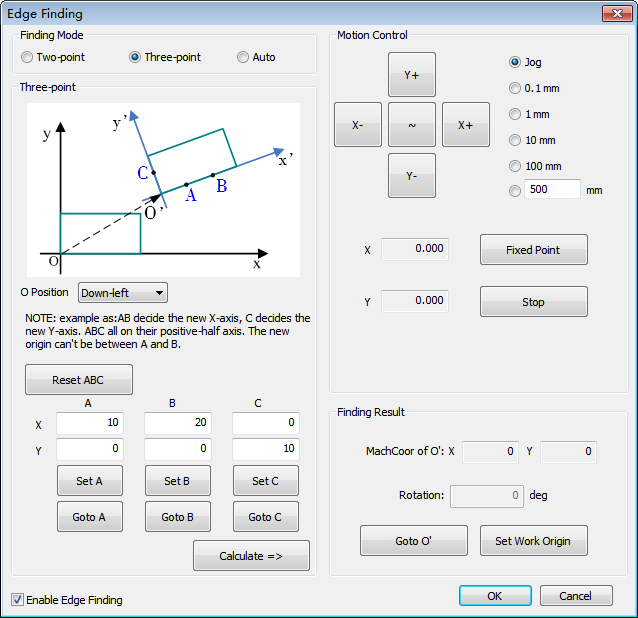
To specify upper right/lower right/upper left/lower left point on the sheet as the origin O' of the new WCS, select a point in O Position.
You can check the diagram in Three-point area to check the situation of point O relative to point O'.
To confirm the new WCS by specifying three points A, B and C, do the following:
To specify points A and B, manually move the cutting head to the sheet edge in X-axis positive direction and click Set A and Set B.
The system automatically connects points A and B to specify a new X-axis.
X-axis coordinate of point A should be smaller than that of point B.
To specify point C, manually move the cutting head to the sheet edge in Y-axis positive direction and click Set C.
The system automatically specifies a new Y-axis by taking a perpendicular line to line AB through point C and confirms a new WCS.
Optional: To specify the points again, click Reset ABC. The system restores the current coordinate to the default value.
Check the calculated locating result in Finding Result area, click Calculate.
If the rotation angle exceeds 15°, it indicates that the sheet is tilted and needs placement and edge finding again.
Automatically Find Edges
The origin O' of the new WCS is the berth point and setting out directions along the sheet edges are the sheet edges close to selected berth point.
Relationship between the berth point and setting out directions along the sheet edges is as follows:
| Berth Point | X Direction | Y Direction |
|---|---|---|
| Lower right | Positive | Negative |
| Upper right | Positive | Positive |
| Lower left | Negative | Negative |
| Upper left | Negative | Positive |
Before automatically finding edges, ensure the berth point is upper right/lower right/upper left/lower left. See Set the Workpiece Origin for details.
To automatically find edges, do the following:
In Edge Finding dialog box, click Auto to switch to automatic edge finding interface:
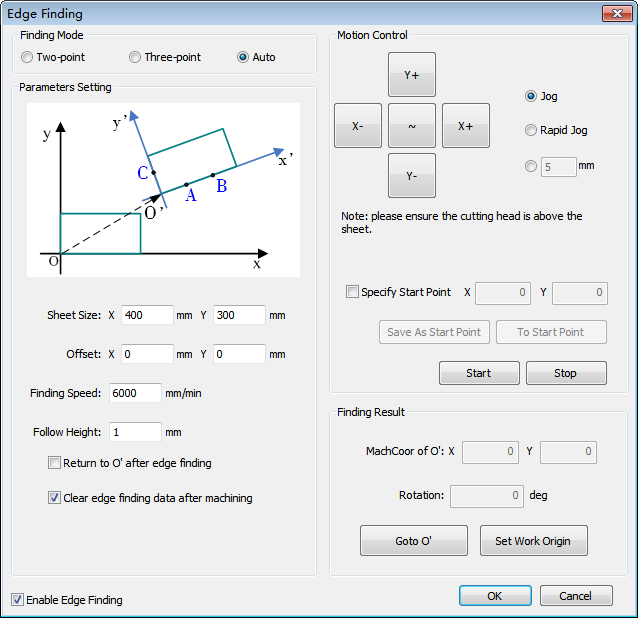
Set edge finding parameters.
Manually move the cutting head to the sheet.
Optional: If it is your first time to find edges, click Save As Start Point to record the machine coordinate of the start point for edge finding, and check Specify Start Point.The system starts to find edges from the recorded start point by default.
To start to find edges automatically, click Start.The system judges the long edge and the short edge according to the set value of parameter Sheet Size.
Optional: Check Return to O' after edge finding.The cutting head automatically returns to point O' after automatically finding edges.
The system starts to automatically find edges as follows:
Locate point C:
Enable the height sensing unit at the current position.
Move towards the short edge at the set finding speed. The out point is point C.
Locate point A:
Enable the height sensing unit at the position which is 20% away from the long edge.
Move towards the long edge. The out point is point A.
Locate point B:
Enable the height sensing unit at an another position which is 20% away from the long edge.
Move towards the long edge. The out point is point B.