Compensate the Kerf
There exists deviation that is caused by the kerf in cuttingbetween the sizes of actual cutting parts and theoretical parts. The deviation leads to a smaller size in the outer contour and a larger size in the inner contour. This operation is used to compensate the deviation.
The supported type of compensating the kerf differs in the type of objects:
Closed objects:
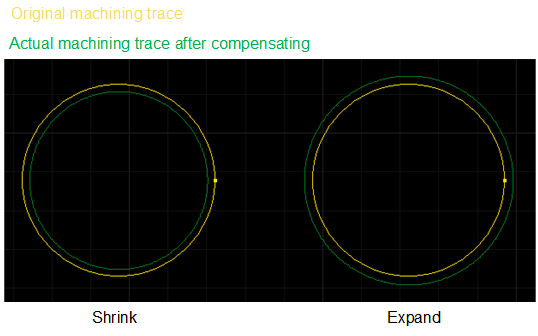
- All shrink: shrink the cutting area.
- All expand: expand the cutting area.
- Unfill: shrink, fill: expand: shrink the cutting area of unfill parts while expand the cutting area of fill parts.
The result of kerf compensation for closed objects shows as follows:

Unclosed objects:
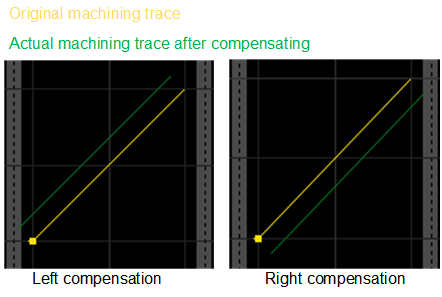
- Left comp: the cutting area moves to the left of the machining direction.
- Right comp: the cutting area moves to the right of the machining direction.
The result of kerf compensation for unclosed objects shows as follows:

Note: Unclosed objects include break lines. And the system compensates the kerf for unclosed objects only in the tube cutting configuration. When you need to compensate the kerf for several unclosed objects, select left compensation or right compensation for them one by one.
Before compensating the kerf, ensure the text has been turned into polylines. See Turn Text into Polylines for details.
To compensate kerf, do the following:
Select the target objects.
To open Kerf Compensation dialog box, do one of the following:
- In toolbar, click
 .
. - In menu bar, click Object → Kerf Compensation.
- In drawing window, right click and select Kerf Compensation.
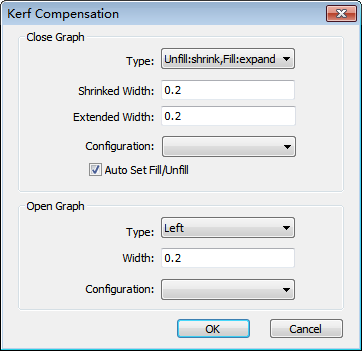
Kerf Compensation dialog box pops up:

- In toolbar, click
According to the type of the selected object, do one of the following:
Close object
Select a compensation type and set parameters Shrinked Width and Extended Width.
Optional: Click Edit in the drop-down box of Configuration and click Add in the Configuration dialog box. The values of shrunk width and extended width are added to Configuration. You can find the data in it next time.
Optional: Check Auto Set Fill/Unfill. The system automatically selects fill or unfill for the target object.
Open object
Select aa compensation type and set parameter Width.
Optional: Click Edit in the drop-down box of Configuration and click Add in the Configuration dialog box.