Nesting Function
This section introduces how to nest toolpaths by previewing nesting effect and analyzing nesting results in NcEditor V12 Laser Cutting CNC System, so as to improve sheet utilization and machining efficiency. It is only applicable to sheet cutting configuration. It is not applicable to unclosed objects, too small parts and parts whose area is 0.
It is based on the principle of part nesting priority and material utility maximization.
Before nesting toolpaths, ensure one of the following:
- You have plugged the dongle into the USB interface of your host.
- You have imported an authorized file.
It includes the following:
- Nest toolpaths: edit parts in the current toolpath and nest them.
- Set one-key nesting: nest the selected objects with one click.
- Bestrew objects: generate the copies of selected object and nest them on a sheet.
Note: Nest Result number mentioned in the following context refers to all results of nesting objects at a time.
Nest Toolpaths
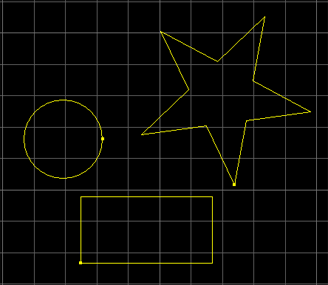
To nest toolpaths, do the following (taking the following figure as an example):

Select the target objects.
To open Nest dialog box, do one of the following:
- In tool bar, click
 to enter nesting area and click Nest.
 - In menu bar, click File → Nest.
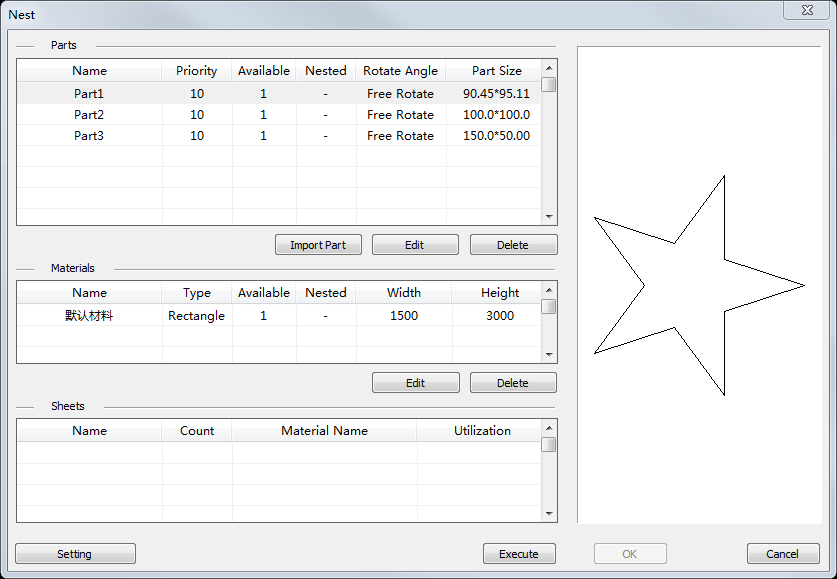
Nest dialog box pops up:

- In tool bar, click
Select the target part in Parts area, click Edit or double click the values to modify the following:
Priority
: The greater the value is, the higher the priority is. On the premise of maximizing sheet utilization, the system prioritizes nesting toolpaths with higher priority.Count
: The number of parts to be nested.Rotate Angle
: Rotation way and rotation angle of parts. The default selection is Free Rotate.Select the target sheet in Materials area, click Edit or double click the values to modify the following:
Name
: Sheet name.Count
: Total sheets.Width
: Actual sheet width.Height
: Actual sheet height.Click Setting. Setting dialog box pops up:

Modify the following:
Material Margin and Part Space
: Distance between parts and the edge of sheet, and distance between parts.
: If the space between parts is zero, it is suggested to share an edge so as to avoid cutting the same edge repeatedly during machining.Start Corner
: Position to start nesting.Nest Direction
: Nesting direction.
: It includes vertical direction and horizontal direction.Click Execute and preview nesting effect in the right area. Nesting results (sheet utilization) show in Sheets area.
If you need to stop nesting, click Stop.
After nesting, do one of the following:
If you are not satisfied with the nesting results, repeat step 3 ~ step 7.
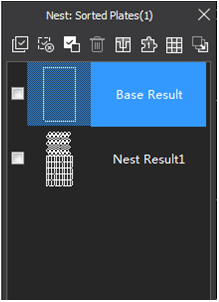
If you are satisfied with the nesting results, click OK. The nested toolpaths show in nesting area:

You can switch to corresponding drawing window by clicking Nest Result number and edit the nested toolpaths further.
Set One-key Nesting
To set one-key nesting, do the following:
Select the target objects.
In tool bar, click
 and select One Key Nest.
Set parameters in Material Param and Nest Param areas.
The default maximum sheet quantity is 999.
After nesting the objects, the nesting edition area pops up.
Preview nesting effect in nesting edition area.
Optional: To edit the nesting result, click the Nest Result number so as to switch to the corresponding drawing window.
Bestrew Objects
To bestrew objects, do the following:
Select a single target object.
In tool bar, click
 and select Bestrew.
Set parameters in Material Param and Nest Param areas.
Optional: Check Delete the nest result before.
With it unchecked, the system automatically generates Nest Result number. The result is showed in the right area.
Preview nesting effect in the right area.
Optional: To edit the nesting result, click the Nest Result number so as to switch to the corresponding drawing window.