Getting Start
This section mainly introduces the following operations for operators to quickly know about how to use NC60A Multi-Process Control System:
- Return to the Machine Origin
- Load a Program File
- Set the Workpiece Origin
- Run the Program
- Execute Multi-tasking
All operations are done under Operator Interface.
Return to the Machine Origin
This operation is used to adjust coordinate position before machining.
Machine coordinate system (MCS) is unique for the machine tool. Its origin is called machine origin or machine zero. It is fixed and defined before delivery of the machine tool.
After software starts, returning to the machine origin is required before machining.
To return to the machine origin, do the following:
Click
 → Homing. Homing dialog box pops up:
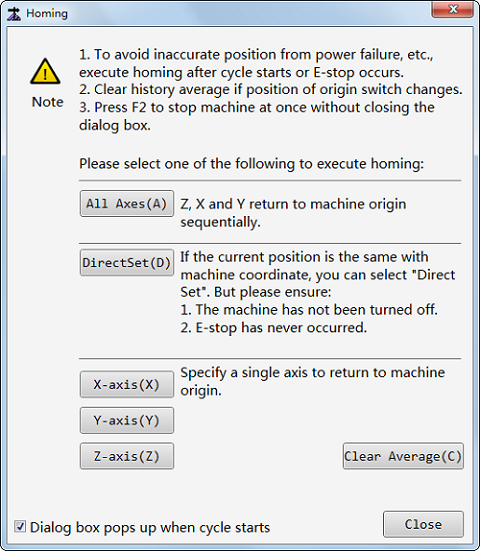
If Dialog box pops up when software starts is checked, the dialog box pops up automatically.
Optional: If the position of the machine origin changes, click Clear Average to clear historical averages.
Otherwise, the prompt Distance between coarse and fine positioning signals exceeds the allowable range compared to the historical average. Failed to return to the machine origin. pops up.
Choose one of the following to return to the machine origin:
All axes
All axes return to the machine origin in order of Z-axis and XY axes.
Direct set
Directly set the current position as the machine origin.
With the method, you MUST ensure:
- The position is the same with the machine coordinate.
- The machine has never been turned off.
- E-stop has never occurred.
Specify an axis
Specify an axis to return to the machine origin.
For safety, it is suggested to firstly return Z-axis, then X-axis and Y-axis.
After setting, the sigh  appears before related axis in axis coordinates display area.
Load a Program File
This operation is used to load a program file for machining.
Before loading a program file, prepare a machining file.
To load a program file, click ![]() and select a program file.
and select a program file.
After it is done, content of the program file shows in Ncfile and Trace window.
Set the Workpiece Origin
The workpiece origin is the origin of each axis in the program file. This operation is used to clear current workpiece coordinate of each axis and set workpiece offset to corresponding machine coordinate of each axis. As a result, the workpiece origin turns to zero.
To set the workpiece origin, do the following:
Manually move the machine tool to the position where you would like to set as the workpiece origin.
Click the lower part of the button
 and select related axis to do clearing:
- All Clear: set the current machine coordinates of all axes as the workpeice origin.
- X Clear: set the current machine coordinate of X axis as the workpeice origin.
- Y Clear: set the current machine coordinate of Y axs as the workpeice origin.
- Z Clear: set the current machine coordinate of Z axis as the workpeice origin.
- XY Clear: set the current machine coordinates of X-axis and Y-axes as the workpeice origin.
To clear current workpiece coordinate, click the upper part of the button
and click OK.
After it is done, the workpiece origin turns to zero.
Run the Program
NC60A Multi-Process Control System supports the following three ways to run the program:
-
Used to automatically run the program from beginning to the end.
-
Used to realize optional skip of the program.
-
Used to control the execution speed manually during auto run so as to avoid tool damage form wrongly loaded program or inappropriate toolpath.
Execute Auto Run
To execute auto run, press ![]() .
.
The system automatically executes the program until end of block or any intentional interruption (e.g. Stop or Pause button is pressed).
During machining, you can do one of the following to control machining:
- Click
 to pause machining.
 - Click
 to stop machining.
 - Click
 to resume machining from the exact interrupted position when power interruption or e-stop occurs and the workpiece origin is secured.
Execute Selective Machining
To execute selective machining, do the following:
Click
 . Selective Machining dialog box pops up:
To select machining rows, do one of the following:
Directly input row numbers in input boxes of Start Row and End Row.
Input a tool number in Find Tool No. input box and click Search.
The system does the following:
- Search from the start row to the end row.
- Find the row where the set tool number appears at the first time.
- Automatically fill the found row number into Start Row input box.
If the tool appears several times in different rows, click Search several times to found the rows.
Click OK.
After setting, click ![]() . The system starts machining from the set start row to the set end row.
. The system starts machining from the set start row to the set end row.
Enable Handwheel Guide
Before using handwheel guide, connect the handwheel to the system.
To use handwheel guide, press ![]() and turn the handwheel to control machining.
and turn the handwheel to control machining.
Execute Multi-tasking
Multi-process, also known as multi-tasking, is a solution to sequential machining of several toolpath files. For each toolpath, you can define machining time interval, workpiece coordinate system (WCS), usage and how many times that the toolpath needs to be machined.
Before executing multi-tasking, ensure the following:
- The filename of each toolpath file is unique.
- The toolpath files are
NCfiles.
According to the selected software configuration, do one of the following to execute multi-tasking:
- Execute multi-process in Double-station Lambda 4S configuration
- Execute multi-process in other configurations
Execute Multi-process in Double-station Lambda 4S Configuration
If the current configuration is Double-station Lambda 4S, do the following to execute multi-process:
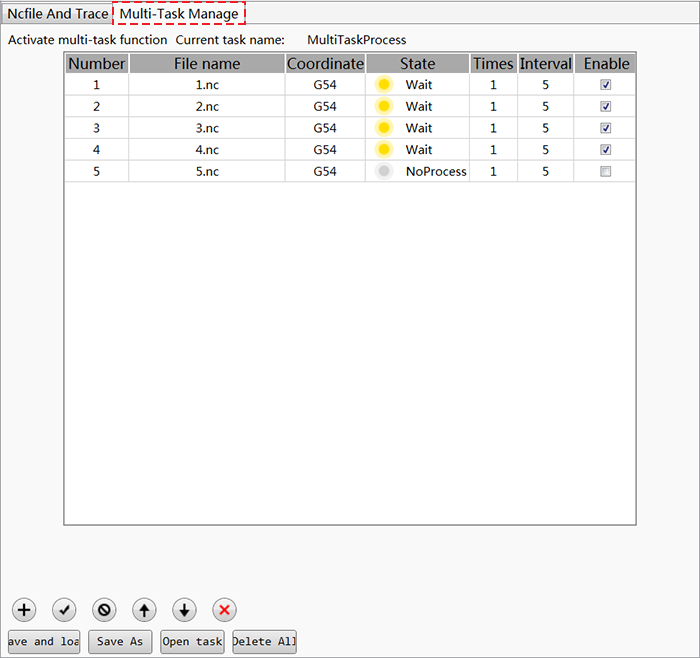
Switch to Operator Interface , and click Multi-Task Manage to enter into Multi-Task Manage window:
Click
 to open Open dialog box, and select one or at most 60
 NCtoolpath file(s) that you need to add to the machining task: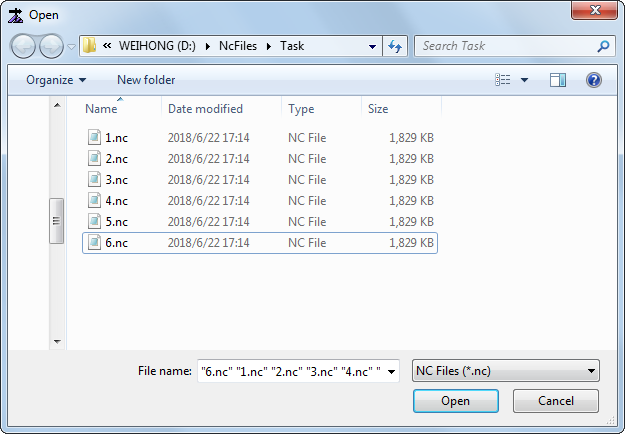
Edit the toolpath file as desired:
- Double click on the file name to select another toolpath file.
- Double click on WCS to define the WCS for the toolpath.
- Click on Times to set how many times the toolpath file will be machined in this task.
- Click on Interval to set time interval between machining of two toolpath files.
- Uncheck the box Enable to deselect the toolpath in the task.
- Click
 and
and  to adjust the position of the toolpath in the task.
 - Click
 to remove the toolpath from the task.
Click Save & Load to save the task and load it into the system.
All settings are saved to a task file with extension filename
TSK.Return to Operator Interface and do one of the following to start machining the task:
- Switch to Operator Interface, and click 1 Start or 2 Start to enable station 1 or station 2 to start machining.
- Click the button on the input port of Lambda terminal board.
The system automatically executes toolpath files in sequence. Machining task finishes when all toolpath files have been finished.
Execute Multi-process in Other Configurations
If the current configuration is not Double-station Lambda 4S, do the following to execute multi-process:
Switch to Operator Interface , and click Multi-Task Manage to enter into Multi-Task Manage window:
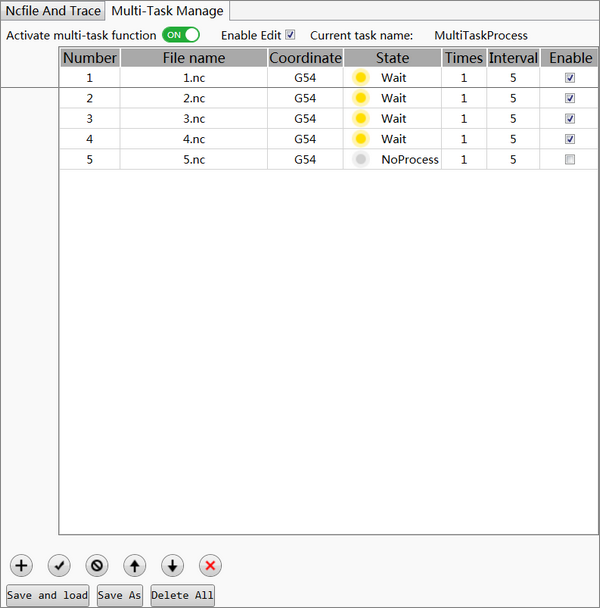
Click on Activate multi-task function to activate the function.
Click
to open Open dialog box, and select one or at most 60 NCtoolpath file(s) that you need to add to the machining task.Check the box Enable Edit and make modifications to toolpath files as desired:
- Double click on the file name to select another toolpath file.
- Double click on WCS to define the WCS for the toolpath.
- Click on Times to set how many times the toolpath file will be machined in this task.
- Click on Interval to set time interval between machining of two toolpath files.
- Uncheck the box Enable to deselect the toolpath in the task.
- Click and to adjust the position of the toolpath in the task.
- Click to remove the toolpath from the task.
To save the task setting, do one of the following:
- Click Save to save it into default directory D: as default filename MultiTaskProcess.tsk.
- Click Save As to save it into any directory as any filename.
To load the task into the system, do one of the following:
- Switch to Operator Interface, and click F1 Load.
- Switch to Technician Interface, and click File → Open & Load or click F1 Load.
To start machining the task, do one of the following:
- Switch to Operator Interface, and click F9 Start.
- Switch to Technician Interface, and click Machine → Program Start or F9 Start.
The system automatically executes the task from the first toolpath to the last one.