Setting the Workpiece Origin
NK300HF Integrated CNC System supports the following three ways to set the workpiece origin:
-
Used to clear current workpiece coordinate of each axis and set the machine coordinate of each axis as the corresponding workpiece offset value.
-
Used to set tool offset so as to determine the specific location for workpiece coordinate system.
-
Used to determine the workpiece origin of regular-shaped workpiece and set the workpiece offset.
Clearing
To do clearing, do the following:
Press
 /
/ /
/ to activate manual mode.
Move tool to the position where is to be set as the workpiece origin.
Press
 → A → F6 to enter into Clear interface:
Do clearing on each axis:
- Press F1 to clear current workpiece coordinate of X-axis to zero.
- Press F2 to clear current workpiece coordinate of Y-axis to zero.
- Press F3 to clear current workpiece coordinate of both X-axis and Y-axis to zero.
- Press F4 to clear current workpiece coordinate of Z-axis to zero.
- Press F5 to clear current workpiece coordinate of all axes to zero.
After doing clearing, the workpiece coordinate turns to zero.
Calibrating Tool
To calibrating tool, do the following:
To enter into Tool Cali interface, do one of the following:
- Press
 →
→
 → A.
→ A. - Press /
/
→
→ A → F5.

- Press
To select calibration method, do one of the following:
Press F3 to select fixed calibration.
With this method, the machine tool calibrates tool on a fixed point so as to reconfirm tool offset. This is applicable to multi-tool mode.
Press F5 to select mobile calibration.
With this method, the machine tool calibrates tool on current position.
Dialog box for confirmation pops up.
Press F6 to execute calibration.
Centering
When a certain axis is centered, the other axis should keep still.
To do centering, do the following(take X-axis as an example):
Press
// to activate manual mode.Handle mode is suggested.
Press
 → B to enter into
Centering interface.
→ B to enter into
Centering interface.To select centering method, do one of the following:
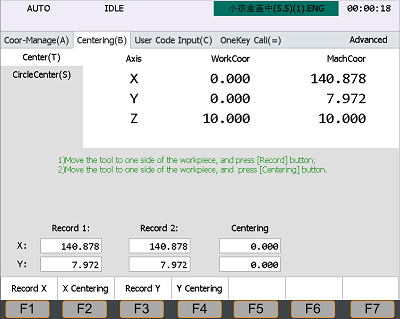
If the workpiece is regular rectangular workpiece, press T to select line center.
With this method, the system finds the center point by two points on the workpiece.
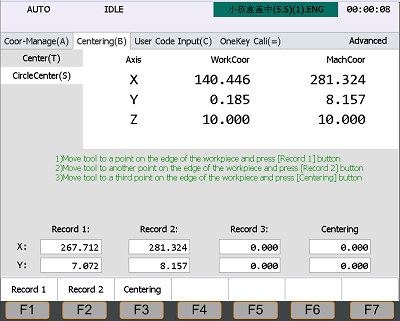
If the workpiece is circular workpiece, press S to select circle center.
With this method, the system finds the center point by three points on the workpiece.
Optional: Press F5 to enable the edge finder.
- Enable: the system can position precisely. At this time, the spindle speed is controlled by parameter 20005 Spindle Speed in Centering.
- Disable: parameter 20005 Spindle Speed in Centering is invalid. The spindle speed will be the setting value for the spindle in the software or the rotational speed specified by S command in the program file.
Manually move the tool to one side of the workpiece and press F1. The system records the machine coordinate of the current point.
Manually move the tool to the other side of the workpiece and press F2. The system calculates the middle point according to the second position and the last recorded values, and sets it as the workpiece origin.
Note: The 4th and 5th steps belong to the operation of line centering. These two ways of centering are similar. Please refer to the steps on the corresponding interface.